In this blog post we’ll discuss how to create and setup new project variants from the Variants screen in XJDeveloper.
Adding a New Variant
Firstly, click the Add… button on the bottom toolbar of the screen. This will open the Add Variant dialog.
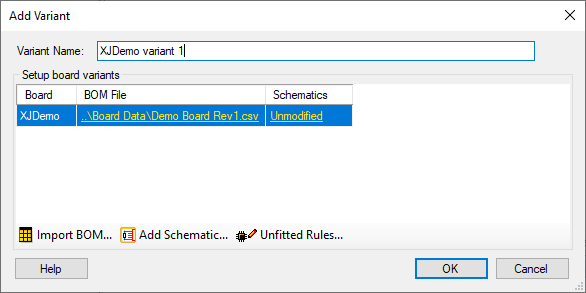
Here you can name the new variant and import a new BOM file and/or schematic for each board. You can also edit the unfitted rules for each board as, depending on the format of your BOM file, these may have changed from the root project. It’s a good idea to add a variant BOM file here because that allows you to use the Suggest Variations wizard.
The Suggest Variations wizard
After clicking OK to create the new variant, and if a variant BOM file has been imported which differs from the root project BOM file, the suggest variations wizard will appear. The wizard can speed up the setup of new variants by generating device variation suggestions which, if accepted, are then applied to the variant upon finishing the wizard. This saves you adding each variation manually afterwards.
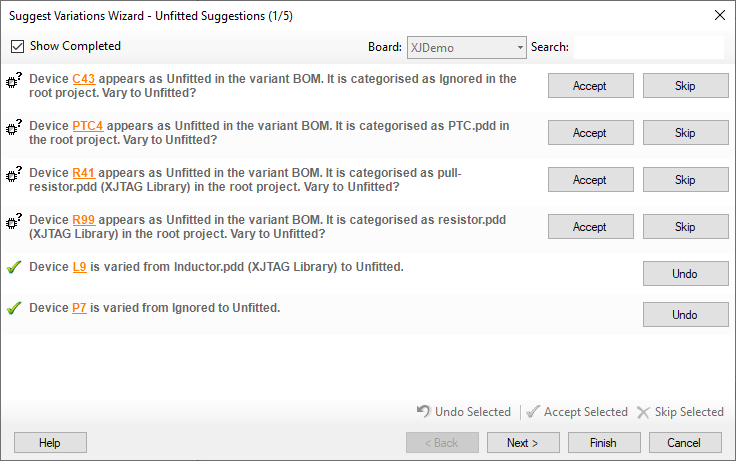
Suggestions are generated by comparing the BOM data for each device from the variant BOM against the root project BOM. Depending on the variant board’s unfitted rules this may involve checking all devices in the root BOM are also present in the variant BOM and vice versa.
There are 5 types of variation suggestion that could be generated:


If a device is suggested as fitted in the variant XJTAG will try and provide a suggestion for how it should be configured, otherwise you can configure the device manually as you would do on the Categorise Devices screen. You can click on the device link to view the device in Explorer and Schematic viewer to aid with categorisation.
When the Finish button is clicked, any accepted or configured variations will be added to the variant project and the wizard closed. The wizard can be relaunched at any time from the Variants screen by clicking the Suggest Variations… button.
Find out more…
For more information on variants you can read the other blog posts (part 1, part 3) in this series, the next blog post will cover adding variations to devices in the circuit. Alternatively, full details of the feature can be found in the XJTAG help for XJDeveloper in the “Variants Screen” chapter.
Leave A Comment