New in 3.13, XJTAG now has support for Variants. This post will attempt to give you an overview of the whole feature and explain how it can be useful in your board setups. As there is a lot of information to cover regarding Variants, we will releasing a 5 part series of blogs, that will become available over the coming weeks.
The intention of the variants feature is to allow the setup for multiple manufacturing variants (aka build options, assembly variants) to be stored in a single XJDeveloper project., thus allowing all the common setup to be shared. Previously a board setup with multiple variants could lead to a proliferation of very similar XJDeveloper projects that was a nightmare to update and maintain. Now all the variants are stored together in one project and at runtime you can simply select which variant to run tests against.
It’s worth mentioning that for XJTAG purposes, a variant is defined as a modification to a board that uses the same PCB (ie. netlist) but has a different set of devices fitted to the PCB (ie. a different bill of materials or BOM). In contrast, if you make modifications to the UUT design using a different netlist, these are defined as revisions, and these must still be stored in separate projects. Please see the Revisions feature of XJDeveloper for help setting up a new project with the new netlist and bringing across all your setup.
The Variants Screen
Starting in XJDeveloper 3.13 a new Variants screen is available in the Screen Explorer on the left hand side of the XJDeveloper interface. From here you can define the variants to your project, give them a name, provide any new BOM data or schematic and identify any devices or other setup that has changed from the main or root project.
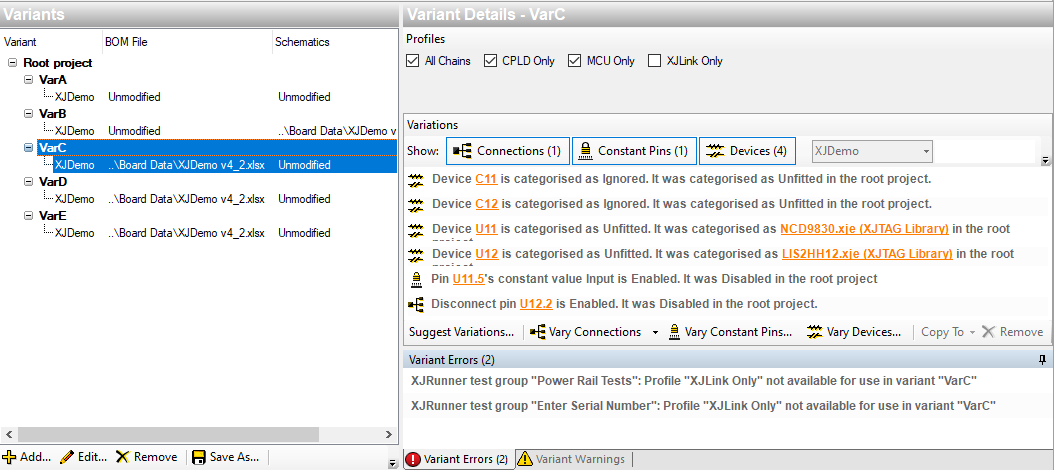
Variants are displayed in a list on the left hand side of the screen; selecting a variant here allows you to view and modify the list of variations for that variant. The list of variations, when applied to the root project, produce the variant project. Variations primarily consist of device categorisation changes (eg. a device changing from Test to Unfitted) but can also include changes to connections, disconnects or constant pins. As part of the Variants feature, a wizard is available to automatically suggest variations for you based on the BOM data you provide.
Preparing and Running Tests
In order to simplify the XJRunner setup, all of a project’s variants (and the root project) will share the same test list. However there are several tools to control the test list flow to make sure only tests that are relevant to the current variant will run.
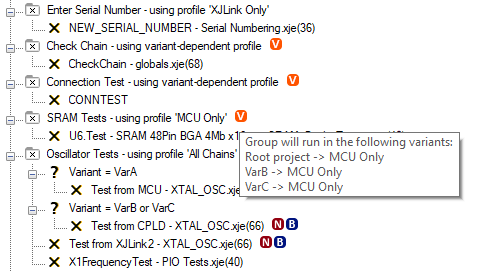
Each test group in the test list can specify which variants should run it. Alternatively, for more fine-grained control, test list conditions can also check the current variant.

Once inside XJRunner, you can simply select a variant from the dropdown at the top of the screen before running tests. The test list will then update to reflect which tests will run in that variant. When exporting your XJDeveloper project to a pack file for use in XJRunner, you can control exactly which variants to include if you need to limit the selection for any reason.
Find out more
For more information on the variants feature including more detail on how to create and setup your variants you can read the other blog posts (part 2, part 3) in the series, which will be published over the coming weeks. Alternatively, full details of the feature can be found in the XJTAG help for XJDeveloper.
Leave A Comment