This blog article is the second part of a three part series detailing the new Revisions feature in XJDeveloper 3.10. This article covers the setup process for a revisions project.
If you missed the first post in the series, you can go back and read an introduction to Revisions in part 1.
The revision setup process

The revision checklist presents the user with a list of items to complete. These items can be filtered using the filter buttons at the top. The progress indicator at the top displays completed stages in green and currently active stages in yellow.
The revision setup process is managed through the Revision Checklist window, which becomes available when a new revision project is created. The checklist contains a list of suggestions or tasks for the user to complete. The checklist will remain open until all tasks are completed, at which point the revision setup process can be completed. Your progress through the checklist is stored when the project is saved, allowing you to come back to a project at a later date. The checklist is designed to make much of the revision process straight forward, but changes can also be made through the XJDeveloper screens if you wish.
The process is split up into between 7 and 13 separate stages, with each stage represented as a chevron in the progress indicator at the top of the checklist. There is some freedom in the order in which these can be completed but we strongly recommend following the suggested order. The process is designed to reduce the amount of work required and many of the device match suggestions will be automatically accepted by XJDeveloper as you progress. Generally you’ll be checking power and ground nets first, before moving onto sorting out the JTAG chain and any external hardware. Once these steps are complete the rest of the device categorisations can be handled before finally updating any outstanding device references with the “(ORIGINAL)” prefix in XJDeveloper.
Once all checklist items are complete the setup process can be completed. Completing a revision will break the link with the source project and leave the revision project as a standard XJDeveloper project. Once this occurs the revision checklist is no longer needed and will no longer appear when the project is loaded.
The checklist items
The checklist items are split into three main groups, Tasks, Missing Devices and Device Suggestions. As these items are completed a corresponding item is added to a fourth Completed group. This group allows you to review the items that have already been completed and undo any changes if necessary. Items are completed using one of the action buttons on the item, or they can be tackled in groups using the Accept/Reject/OK selected options in the checklist toolbar.
Tasks usually require the user to manually do something, e.g. check power and ground nets. Device suggestions give a suggested match or mapping between a categorised device in the source project and a device in the new project. Missing devices include any devices from the source where no suitable match in the revised project has been found. The majority of items will be Device Suggestions, an example is shown below.

An example Device Suggestions item. It represents a match between a device in the source project and the current revision, giving a percentage score for the likelihood of the match being correct.
The item consists of a percentage score, calculated by the matching algorithm, which represents the likelihood of the match being correct. If you mouse over the score a pop-up with a detailed breakdown is displayed. This example suggests a match between R44 in the source project and R46 in the revision project. Clicking Accept will cause the device categorisation to be copied from the source project and applied to the device. Any references to the source project device (R44) (e.g. in a connection or a testlist item) will be automatically updated to use the revised reference designator (R46). References in the revision project that have not been updated will be shown with an “(ORIGINAL)” prefix.
Viewing netlist elements
Nets and Devices from both the source and the revision project can be viewed in Schematic Viewer, Layout Viewer, or the Netlist Explorer. Being able to compare side-by-side the source and revision netlist elements makes reviewing the checklist items easier. Which project is currently under view is indicated by a coloured banner at the top of the window. Simply click on any device or net link in the checklist to view in Explorer. Explorer, Schematic Viewer and Layout Viewer options can be accessed via the right-click context menu from the relevant checklist item. Alternatively options for viewing the source and revision projects can be found in the XJDeveloper View menu.
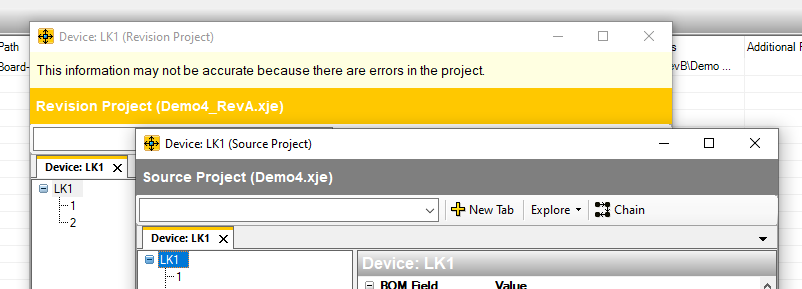
Two Netlist Explorer windows, one showing a device from the source project and the other showing a device in the revised project.
Find out more
For more information on creating a revision and how the device matching works you can read the other blog posts (part 1, part 3) in this series. Alternatively, full details of the feature can be found in the XJTAG help for XJDeveloper in the “Revisions” chapter.
Leave A Comment