So, you’ve set up your variants with all the right BOM data and categorised all the devices (perhaps using the Suggest Variations wizard), now you need to actually test them!
Although variants behave like separate projects in some ways, they all share the same test list. This is a powerful feature, as it removes any duplication and allows changes to be made to all variants together. And it means all variants of a project can share an XJPack file, so it’s straightforward to switch variant at runtime once your project is deployed to XJRunner. However, it’s important to get the test list setup right at the XJDeveloper stage. There are several tools to help you with this in XJDeveloper that we’ll discuss below.
Adding tests
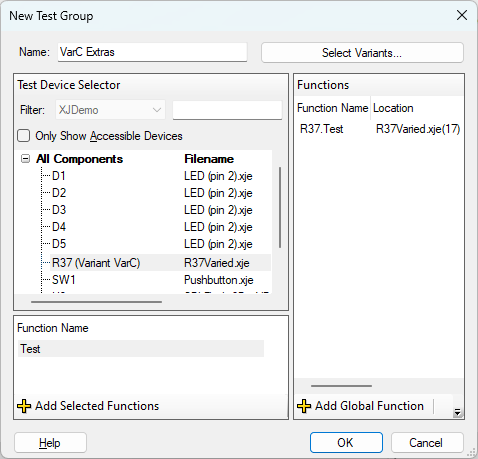
When adding tests on the XJRunner Setup screen, you can now see test devices across all variants in the Test Device Selector on the Add Test Group dialog. Devices which are not categorised as test devices in the root project are labelled with the variants they appear in.
Test list flow control
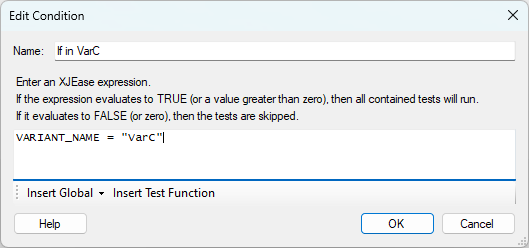
Since XJTAG 3.5 you’ve been able to use test list conditions to control the execution of the testlist and this is something that is fully supported for a variants setup too. The new VARIANT_NAME XJEase keyword is provided specifically for this purpose. It can be queried at runtime to turn on or off sections of your test list as desired.
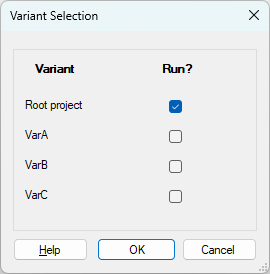
However solely using conditions can get cluttered for projects with a large number of variants, so we have introduced a new more fine-grained control system for individual test groups. How this works depends on whether your project uses multiple JTAG profiles or not, but we’ll look at the simple case of a single JTAG chain configuration first. When you edit a test group, there is a new “Select Variants…” button in the top right that launches a simple dialog to enable or disable the group on a per variant basis.
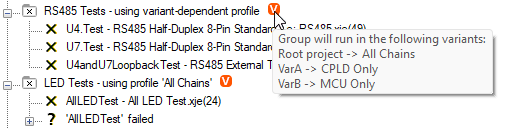
So if you’ve got a variant that is missing some test devices or makes a part of the circuit JTAG inaccessible, its easy to turn off those specific tests in just that variant. And if multiple test groups are affected, you can select all of them (using Shift- or Ctrl-clicking) and enable/disable them together. Tests that behave differently in different variants are indicated on the XJRunner Setup screen with an orange V icon. Mouse over the icon to see a tooltip listing all the variants a test group will run in.
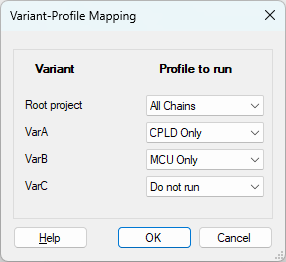
Now, in the case where there is more than one JTAG profile in the project, things get more complicated. Rather than a simple toggle on/off per variant, each test group must now also specify which profile will run per variant. Which brings us on nicely to…
Variants that affect the JTAG chain
Turning on and off tests is not the only way that variants can affect the test list. If the JTAG chain itself is different between variants then the way the tests must run will also change. XJDeveloper represents this using JTAG profiles. Normally each test group in the test list would specify a single JTAG profile to run but with variants, this can now be multiple profiles, one per variant. This is called a test group’s variant-profile mapping. For these projects a “Select Profiles…” button is now shown in the Edit Test Group dialog instead of a profile dropdown. Clicking this will launch a dialog set the variant-profile mapping for this test group.
Find out more
For more information on the variants feature you can read the other blog posts (part 1, part 2, part 3) in this series. Alternatively full details about setting up your test list or variants in general can be found in the XJTAG help for XJDeveloper.
Leave A Comment